The Borden’s “Butter Dish” Milk Tank Car
by John Canfield
Part I: Kitmaking for Dummies (or Hats Off to the Guys That Do It For Real!)
Back last winter, I picked up some old Red Ball kits from the late 50’s on ebay, mostly out of curiosity because when I was a kid back then I thought they must be wonderful. Well, of course, by today’s standards they weren’t – cardboard sides with printed on hardware, castings covered with toxic lead dust, and instruction sheets with totally indecipherable sketches that must have been written up after somebody downed a couple of six packs of Rheingold (Howell Day was in Jersey, right?).
But one particularly strange one was the Borden Butter Dish milk reefer – a wood former over which you glued a cardboard wrapper that was printed in a weird orange color impossible to match with any Testors or Floquil product made since ’55 and a pot metal brake cylinder that looked like a melted tin soldier. But along with these shortcomings came some side and end beams with some pretty good rivet detail and some superb brass handrail stanchions like the ones that always came in a plastic box along with tons of Mantua couplers and Kemtron stacks from some old man’s estate sale.
Having had lots of experience in resin casting making dirt track tires and other accoutrements for 1/25 scale 60’s dirt track cars, I thought hmmm………it’d be real easy to make a one piece resin body for this car and eliminate that weird orange mess. So I made a mold master from wood, covered it with .005 sheet plastic, added the door hinge details and fins on the ends, marked the location for the other parts, poured rubber over it and, voila, a mold mold. The first resin pour came out absolutely perfect - - smooth, crisp end fins and drip strips, great hinge and handrail end bolt details. Wow, I thought, this is great, so I made a few more.
Then it dawned on me that I could replicate those old Red Ball side and end beams and frame from some smooth plastic with rivet details so I made some masters for those, then the molds, and some more great pieces emerged. Say, I thought, I could go from here and make up some pretty decent kits! My fervor was temporarily crushed when I ran across ads for Funaro and Camerlengo kits of the very same butter dish car being sold, but then I thought well, theirs are less couplers or trucks (or something) so they need some COMPLETE KIT! competition anyway.
I started to do some research and found that the Illinois Railroad Museum had perfectly restored the Borden BFIX 520, the last butter dish car known to exist. I wrote to them and told them of my idea of putting together some kits of the old girl and asked if I could “borrow” some of their pictures from their website in exchange for a donation for each kit I sold. Even though I told them to forego any delusions of Walthers-like kit runs of hundreds of cars but more realistically like 10, the President of their Board, Barbara Lanphier, told me they would be delighted to let me use their pictures and Bob Kutella, their Freight Car Curator, gave me some great tips on the underbody detail of the car that were all in shadow in the photos.
So then came the real fun………figuring out what other parts to use and then trying to find them. Car weights? Easy – big nuts glued into holes I could drill in the bottom of the body. Stanchions? Geez, Precision Scale makes a jillion of ‘em. Trucks? Eastern Car Works Express Reefer trucks are perfect!! Brakes? Good old Cal-Scale, still in business, makes some great express reefer sets. Decals? I’ve made my own for years, no problem. Tons of handrail stuff from Tichy, lots of wire I got, couplers from McHenry, piece of cake!!
Then to my dismay on the Walthers and Caboose Hobbies websites I faced the five most dreaded words in the English language: “OUT OF STOCK” and “BACK ORDER”. You could find Eastern Car Works trucks by the dozens but they had cleverly but strangely decided not to include their wheelsets in the kits which were sold separately and, of course, on “BACK ORDER.” As for the handrail stanchions, Precision Scale makes 17,000 different parts but “NOT ALL AVAILABLE AT ALL TIMES – BACK ORDER”. Cal-Scale had apparently moved from someplace in sunny Surf City to the mountains of Pennsylvania and was now owned by Bowser (hey, didn’t they used to make all those great PRR zamac locos?), but as for the Express Brake Sets? “OUT OF STOCK – DELIVERY UNKNOWN”. Tichy and McHenry stuff was real plentiful, but without wheelsets for the trucks, brakes, and handrail stanchions, my pieces of beautiful resin sat forlorn and unfulfilled.
Then I said this is nuts - - for the wheelsets, easy to sub Kadee or LifeLike and they’re metal to boot. More than one way to skin the Precision and Cal-Scale cats, I thought, so I bypassed the Walthers-Caboose-InternetTrains middleman combine and called the two outfits directly. And you know what? Nicest folks in the world. “Glad to sell direct”, the lady at Cal-Scale/Bowser said, “and if you want 10 brake sets, I have three on hand and I’ll have “him” make up seven more sets tomorrow”. The daughter of the owner of Precision Scale out in Montana said “gee, I’ve only worked for dad for 4 days but there must be some handrail stanchions here someplace” and a few minutes later she came back and said “we got lots – how many do you want?” So this was great, but I actually felt a little guilty because I was taking stuff out of the pipeline that wouldn’t help to delete those “OUT OF STOCK” and “BACK ORDER” messages that daunted less resourceful fellows daily at Walthers/Caboosehobbies.com.
I finally managed to get enough for 10 kits together, made up some instructions that were so anally detailed they would make Al Seebach blush, and up on ebay they went.
The reception was huge - - I got such good prices for them that not only was I able to up my donation to the Illinois gang to $5 for each kit but was also able to give the Society of our FAVORITE milk-hauling road $5 for each one sold, too. So let’s see, after the donations to the IRM and the OWRHS, and the cost of all the parts, and those big shiny nuts, and the boxes, and the little plastic parts bags, and the decal paper, and the tissue paper filler, and the resin, and the rubber for the molds, I figure I probably cleared the princely sum of just about 35 cents an hour for my labor.
So take some good advice: although it’s fun and challenging to throw together a few kits of an unusual car that people will enjoy, all the headaches and the hours of research and then parts search just ain’t worth it. Best left to Al and the rest of the pros who do this for a living and I say more power to ‘em!
Part II: A Brief History
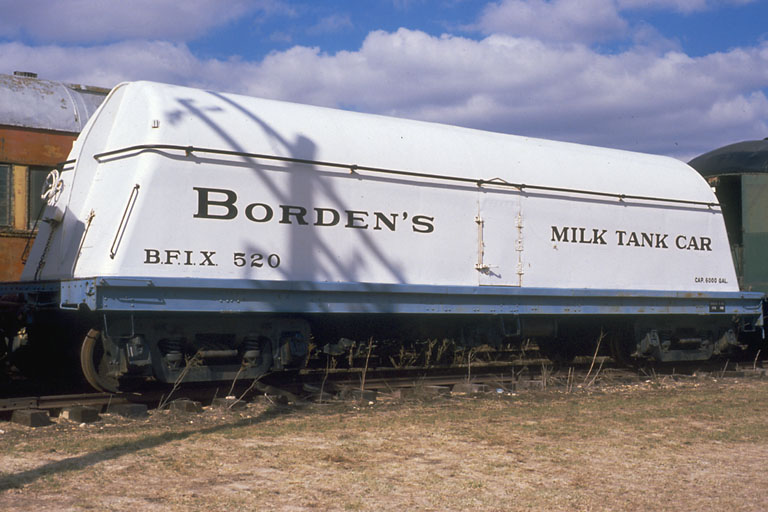
Photo courtesy of the Illinois Railway Museum
During the first half of the 20th century, Milk was certainly a mainstay commodity for the railroads that ran through fertile dairy country in the Northeast. Creameries were built along the right-of-way where farmers delivered milk in cans via horse-and-wagon and later, trucks and the creamery’s finished products were then hauled away by rail. Because of its perishable nature, milk was normally shipped in reefers that ran on the head end of fast passenger trains and were equipped with high-speed trucks and passenger train air braking systems.
For more information on the heavy milk traffic shipped by rail, I highly recommend Robert Mohowski’s excellent book, “The NYO&W – Milk Cans, Mixed Trains, and Motor Cars” as THE authoritative volume on how a railroad, in this case the now-defunct New York, Ontario, and Western, depended so highly on the milk trade.
The Borden Company, home of “Elsie the Cow ®”, built many creameries throughout upstate NY and New England and was an innovator in milk rail transportation. Perhaps its most distinctive creation was the “Butter Dish” milk tank car which began service during the Art Deco days of the 30’s. With its unique sloped streamlined design, the resemblance to a butter dish was obvious and hence the colorful nickname.
Today, only one Borden’s butter dish car is known to be in existence, residing at the Illinois Railway Museum in Union, Illinois. The museum (www.irm.org) has restored this car to near-perfect condition.
I thank the Museum for their permission to use photos of this car. For every one of these kits sold, a donation will be made to the Illinois Railway Museum to help with the upkeep of BFIX 520. An additional donation will be made to the New York, Ontario and Western Railway Historical Society which is a repository for a huge volume of pictures and documents of this now long-gone milk by rail business. Incidentally, it is not certain if the butter dish milk tank cars ever traversed the NYO&W but if so it was prior to 1937, according to Bob Mohowski’s book.
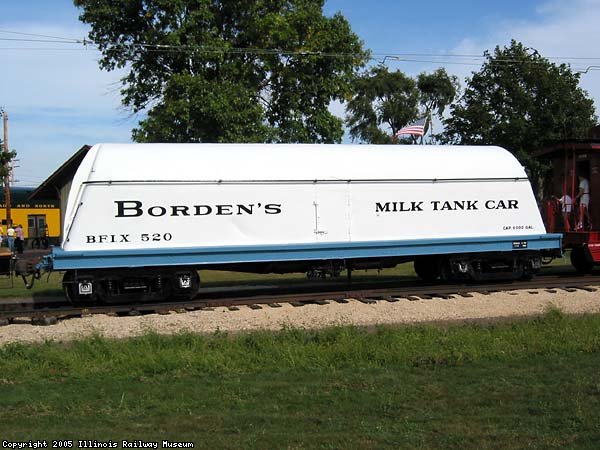
Photo courtesy of the Illinois Railway Museum
Part III: On to the kit!!!
This kit should be easily manageable by anyone with any experience in building craftsman-style kits. I have attempted to provide instructions that will guide you through the assembly based on my experience building the “pilot model” but feel free to deviate if you know a better way. This kit is complete with everything you need except for glue and paints and patience!
TIPS ON WORKING WITH RESIN: You may wish to sand more smoothly the tops of the ends of the body, etc. but GO SLOWLY. Resin sands very easily but you can take off too much if you are not careful. For gluing, I find that gap-filling super glue works best and gives you some time for positioning. That old standby, Walthers GOO ®, also works surprisingly well for resin-to-resin or resin-to-other material joints.
The body casting (including cast-on reefer door hardware), side and end frames, underframe, and bolsters are made of high quality Micro Mark ® resin. This material cures with few if any pinholes and as you can see provides a nice smooth finish. BUT BE CAREFUL IN WHAT YOU SAND OR FILL IN!! There are six indentations on each side which are the locations for the handrail stanchions. On each of the “fins” on the end of the car, is an indentation for the handrail hole. On each end of the car, on each side there are two tiny nut-bolt-washers cast onto the body which mark the ends of each handrail.
Some of the end beam, bolster, and frame castings required some typical resin casting cleanup (removal of flash, etc). On the bolsters, make sure that the top of the bolster is sanded flat. On the end beams, clean out any flash that remains in the “coupler pocket” rectangle on the bottom of the beam as well as any flash around the edges of the beam. Clean out any flash that remains between the frame members. Don’t worry if the beams are “bowed” as they bend easily and stay straight when glued. (“Colored” resin castings are more flexible than the standard white castings).
Even though I use no mold release, prior to painting I would suggest mildly washing off any fingerprints, etc. from the body itself. But be careful!! By painting time you will have added many details and, in addition, some of these bodies have the drip strip above the doors cast on, some have separate pieces of plastic glued on. If you knock off the plastic ones, simply glue back on with super glue.
The side and end frames have been pre-painted with Testors Model Master “French Blue”. In addition, these parts have been cast in blue resin so little touch up may be necessary. If you need to, the French Blue is available at any hobby shop or from Walthers, etc.
The underframes and bolsters have been cast in black resin and then oversprayed with Testors flat black enamel in case you need any touch-up.
Here are the parts included with this kit:
Body casting with door hardware, handrail bolts, and brake housing cast on
2- End beams
2- Side beams
2 -truck bolsters
1 – underframe
1 pair with wheelsets – Eastern Car Works passenger car trucks
2 pair with draft gear – McHenry couplers
12 – handrail stanchions
4 – straight grab irons
4 – drop grab irons
small length chain
1 set – Cal Scale Express Reefer brake sets
1 - brake wheel
1 - underside floor panel
decals
.010 wire (end handrails)
.015 wire (side handrails)
2 - big nuts
2- 2x56 truck mounting screws
2 – small screws for coupler draft gear
2 – pieces of tubing for center of truck mounting holes
2 - washers
Assembly Guide
Here are steps that will help you assemble this car. STOP! means something important so don’t do that step until you read it. TIP: is just something that’s a little helpful.
STEP 1 – Body Weights
The two big silver nuts are for additional body weight. Glue them into the recesses in the bottom of the body casting. GOO ® works perfectly for this.
STEP 2 – Underside Floor Alignment
Take the underbody floor (scribed plastic sheet) and place it scribed side facing out on the bottom of the car. Sand the floor so the edges are perfectly even with the edges of the body casting. This is necessary for the later addition of the side and end beams. We suggest marking the floor and a corresponding spot on the body casting so you know which way is which later.
STEP 3 – Handrail Stanchions
Locate the handrail stanchion mounting holes on the side of the body casting. There are six on each side. Drill them out with a #66 drill and using a drop of super glue on each, cement the handrail stanchions into the holes. Make sure the stanchion “holes” are all facing east and west! STOP! Before separating the stanchions from the sprue, make sure the holes on each are open all the way. Drill each one with a #76 drill just to make sure. It is much easier to do this now than later when they are on the car.
STEP 4 – Side Handrail forming and installation
Locate the hole indentations on each fin on the ends of the car. If not clear, the hole should be at the same height as the side handrail stanchions and about midway across the fin. Drill the hole open fully.
Here’s how I suggest you make the handrails. Cut a piece of .015 wire to be long enough so there is enough wire to go along the length of the car and then bend toward the fin on each end and be more than half the width of the body. (like a U shape with the long side on the bottom of the U). Then thread the wire through the side handrail stanchions. You will have a lot coming out of each end. Using pliers, carefully bend the wire at one end of the car at a 90 degree angle so it goes directly toward the hole in the fin. Then stick that end through the fin to hold it. Now do the same at the other end, making sure that the wire you have bent at the first end remains square with the body. Then carefully remove the wire from the fin on each end and cut the wire as close as you can to where it will go halfway through the fin hole. (The handrail from the other side will come in and take up the other “half” of the fin hole).
Now repeat for the other side. Once every thing is nice and square, put a drop of super glue in each fin handrail hole, on the last stanchions on each side, and on at least one other stanchion on each side. This will hold the handrails nicely in place.
STEP 5 – Forming end handrails
Locate the bolt castings on each end of the car. There are two sets on each end and the one near the brake housing is much shorter than the other side (to clear the brake wheel). Drill a #77 hole at the bottom of the top bolt protrusions and at the top of the bottom bolt protrusions. Then using the .010 wire, bend to fit handrails into each pair or openings. Measure each one separately as they many not be exactly the same length, give or take a couple thousandths! Put a drop of super glue on the ends of the handrails and cement in place. TIP: Use a paper match from a matchbook as the spacer between the handrail and the car body to determine how far out they should be. Works perfectly.
Step 6 – Brake Chain/Brake Wheel
Using a # 61 drill, drill a hole in the bottom of the brake housing for the brake chain. Cut a piece of the chain long enough to hang just below the “ridge” on the bottom of the end of the car. Glue the upper end of the chain into the hole with super glue. Then using a #64 drill, drill a hole in the brake housing for the brake wheel and then glue in the brake wheel with super glue.
Step 7 – Painting the body
You now have completed the body with details so this is a good time to paint it. I used Floquil reefer white airbrushed on in several light coats. Floquil lacquer has excellent adhesion to the resin whereas sometimes enamels will not adhere well if there is ANY body oil, etc. on the resin. Once painted, set the body aside to dry well – you have stuff to do on the bottom before getting back to it.
Step 8 – Floor, frame, body bolsters, coupler draft gear
Take the floor you “trued up” back in step 2. Carefully measure and mark the center point of both the length and width of the car. Now superglue the frame casting to the scribed side of the floor lining up the center beam with your lengthwise centerline. Then superglue the body bolsters to the floor butted tightly against each end of the frame. Now, take the “box” half of the coupler draft gear and glue it to the end of the floor, lining up the center of the draft gear with the centerline you have made on each end. The open end of the draft gear should line up with the end of the floor.
STEP 9 – Air Brakes
Install the express reefer brake set following the instructions included. There is no best way to do this – install it as best you can (remember to use superglue for plastic to resin bonds) and with as much detail as you want. You should install at least the major pieces to give the “look” of having brake gear. Piping, rodding, etc. is up to you. STOP! Check to make sure that you are installing the brake gear so that the gear correctly faces the end of the car with the brake wheel. You should be able to determine this from the floor to body “orientation” mark you made earlier (hopefully!). STOP! After you have determined where to place your brake system components, check to make sure that the truck clears all of the components and is free to swing before you install the brake gear. (You may wish to assemble the trucks now (see step 15) to check for clearance but don’t install them yet.)
STEP 10 – Underbody pilot holes and painting
The underbody is now completely assembled. Drill pilot holes in each bolster and in the hole in the center of the draft gear for the screws we will use for the trucks and couplers later. Now you can paint the whole underbody. You can use a lacquer with an airbrush but truthfully Testor’s Flat Black enamel spray is goes on thin and dries very fast. However you do it, let the bottom dry.
STEP 11 – Applying the decals
Now is a good time to apply the decals to the painted body casting (make sure it’s good and dry!!). STOP!! Please note that the lettering is printed on both sides of the decal paper (paper loaded the wrong way first time!). Make sure you cut out the decals from the shinier side of the paper!
These decals are made by me but are like any others – a few seconds in water and they are ready to go. Experts say it’s best to apply them to a gloss finish but on this car, I used the Micro Sol method and it worked just fine on the dull Floquil surface. Make sure you blot out all air bubbles and when the decals have dried, I suggest a fine coat of Testors Dullcote spray to hide the decal film and give the car an even finish. Let this dry well before the next step.
STEP 12 – Gluing the floor to the body
Glue the floor to the bottom of the car. Superglue works well but so does GOO ® on a large area like this. Make sure the edges of your floor true up exactly with the edges of the body casting.
STEP 13 – Attaching the end and side beams
Before gluing on the end beams, hold the beam on the brake housing end up and determine where the chain from the housing falls. Notch out the end beam slighltly so it appears that the brake chain goes down behind the beam. Now glue the end beams to each end. The beams should be centered so the coupler opening is exactly centered on the draft gear box on the floor and that the top of the coupler opening is exactly parallel with the bottom of the scribed floor. You want the coupler to slip through into that box nice and easy!
Once these are dry, measure the exact distance on each side between the end beams and, if necessary, trim the side beams to length. Trim off any excess a little from each end to insure all the “bolt” patterns stay centered. Once cut, glue them to the bottom of the car sides and the end of each end beam with the tops exactly even with the top of each end beam. You can superglue these but again, GOO ® applied in a fine strip also works well here.
Step 14 – Install the couplers
Once everthing is nice and dry, slide the McHenry coupler through the coupler hole on the end beam and over the “cylinder” in the draft gear. It should fit easily. Attach the draft gear cover using the small screw into the pre-drilled pilot hole. Screws cut very easily into the resin.
Step 15 – Assembling and installing the trucks
If you haven’t done so already, assemble the Eastern Car Works trucks per the instructions. The truck mounting holes are actually larger than the 2-56 screw so there is some sideways movement once installed. If you want to correct this, in your parts bag are two tiny bushings made from 1/8” pipe. “Press fit” them into the truck screw holes then Glue with plastic cement. Once dry, sand the bushing flush with the top and bottom of the truck frame and take your xacto knife and ream out the bushing until it just clears around the screw - - no more sideways wobble.. To allow maximum truck clearance, place one of the washers on the top of each bolster then using 2x56 screw, mount the trucks to the body.
Step 16 – Grabirons and steps
There is a drop grab iron at each end of each end beam and a straight grab iron at the end of each side beam. Drill #78 holes to install these and super glue them into the holes. (You can use the old match method to determine clearance from the beams).
There are steps mounted to the underside at the end of each end beam approximately under each side grab iron you have installed. Drill #72 holes in the bottom of each end beam and install the steps with superglue. You may paint the steps and grabirons with the French blue paint or black or silver or whatever you like – the originals appear to be blue)
THAT’S IT – YOU’RE DONE!! Check for any paint touch ups that may be needed using the matching paints I mentioned earlier. Cut her into your crack express on the front end and get that milk down to the kids in the city! Thanks, and hope you’ve had fun………..and remember you are also supporting two good causes!!
April 2005
John Canfield
1701 Hurlingham Court
Virginia Beach, VA 23454-1173
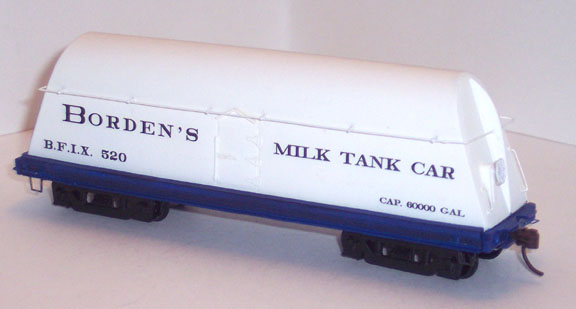
Photo of Pilot Model (brakes and brake chain not installed)